|
| |
Field Mapping Interesting Stuff |
|
 |
The Field Map app allows you to track where you go similar to GPS units sold strickly for that purpose.
In addition, the app allows you to stop and take pictures and notes of things that need special attention.
For farmers this may be an insect problem, weeds, or crop damage. These spots are flagged on the map so that you can navigate back for future inspection. Notes are numbered
are given a title and a description (as desired) and put into a database with the date, time and GPS coordinates.
Simple waypoints may be captured for whatever purpose desired whether it be turns on a trail or rocks in
a field.
The Field Map app uses a map "picture" so that cell phone or internet access is not necessary
to use the app. Technical details for this follow. If you would prefer, Out Farming will create maps
for you for a fee.
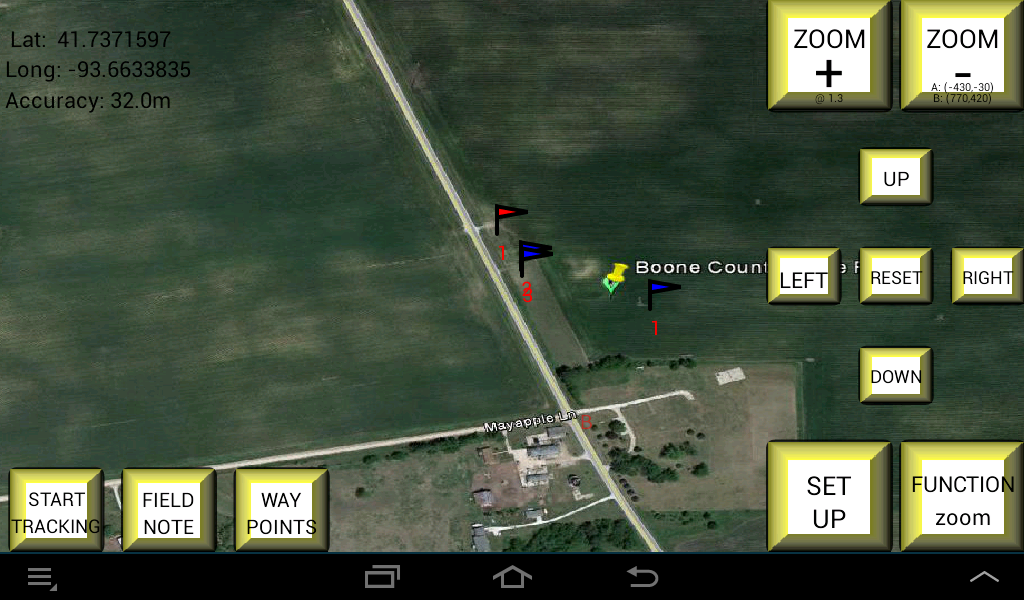
Here's how you set up the app:
- When you first set up the app, you will need to create your own maps once.
- Look at the map supplied and find the red A and B spots in the upper left and lower right of the screen.
- Spots A and B have GPS coordinates associated with them. You will need to create A and B on your map.
- Using a PC or other program on you Android, load a jpg or png picture of the field or area you want from Google Earth (TM), your county assessor's
GIS system, a picture from a quad copter, etc. Paste it in the right directory with Android's file app -
//storage//emulated//0//Android//data//com.outfarming.field_notes. If you have temporary internet access,
you can use a web browser and maps.google.com (TM) to display and capture a map.
(- If you don't have a picture use the supplied picture "blank.jpg" and skip down to the instructions for
the Start at Center screen.)
- On the main map screen, mark the upper left corner of your field with an "A". Do the same thing
and mark a "B" in the lower right hand corner of the field. You do this on the main map screen by
pressing the Function button twice until "move A" is displayed. Then you press the LEFT RIGHT UP DOWN
buttons to move the "A" on the map. Press the Function button again to move "B". Return the Function
to "Zoom".
- From the Setup screen "Set A & B Corners" enter the GPS coordinates of "A" and "B". Use Google Earth or
whatever other source you have for these coordinates.
- If you don't have access to the GPS coordinates, drive to "A" and set the GPS coordinates there from the
button on the "Set A & B Corners" screen. Do the same for "B".
- Return to the main map screen. Your location will be marked by a red circle with a black ring around it.
- Press the Start Tracking button if you want to follow where you go on your field. On the map you will see
a trail of where you travel.
- Make sure the Function button shows "zoom". If it doesn't, press the Function button until it does. Then you may zoom in, out, left, right, etc.
- When you are at a place you want to create a field note or waypoint, press the appropriate button.
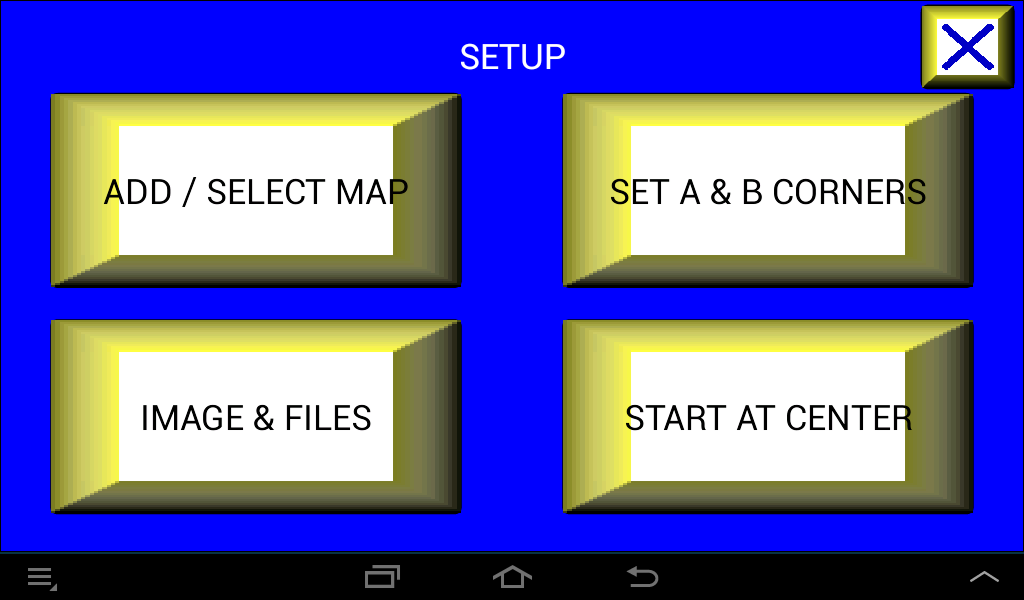 |
Here's the Set Up screen showing its four options.
 |
- The Add Select Map screen allows you to create new maps or change between maps. You
can see the name of the current map in the Map Selected box. To select a different
(existing) map, click on the map name on the right slider and press the "Press to Load Map"
button. Up to 20 maps may be saved. Pressing the ">>" and "<<" buttons allows you to scroll forward
and backward in the list.
- To start a new map, give the new map a name in the "For New Map" box. Then press the "Start New Map"
button. You will then have to change the image associated with that map and set up new A & B points.
- To backup the map information or restore it, there are buttons labeled "Save to maps.csv" and
"Load from maps.csv". These don't usually need to be done but it saves me from having to
re-enter image names, A & B points, & GPS coordinates when I make large changes to the app or
load it onto a new tablet or phone.
- To delete information about a map, first select it so that it is the current map selected.
Then press the "Press to delete map &/or info". It gives you a warning allowing you to not do it.
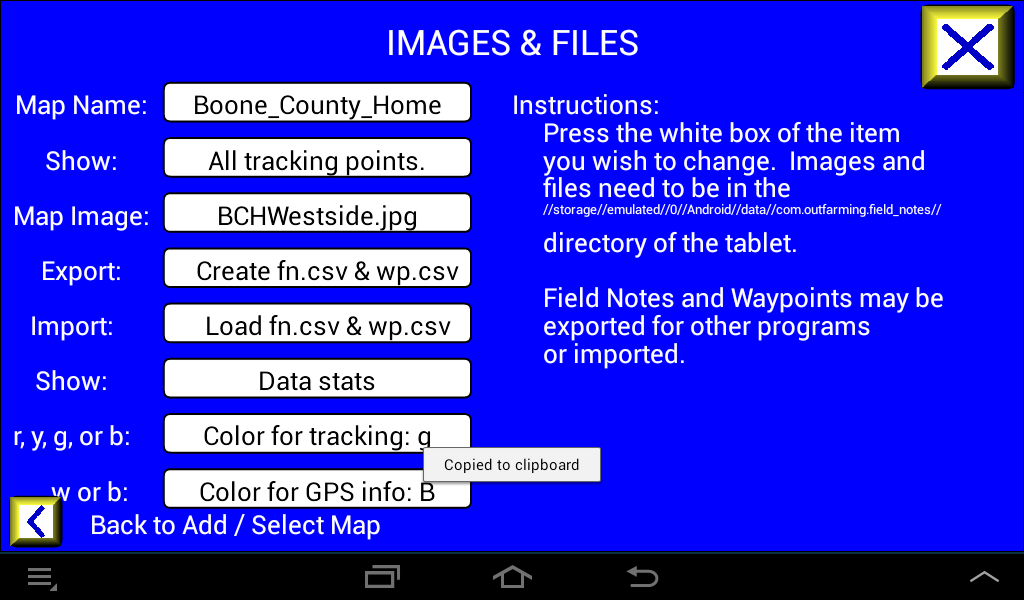 |
- The Map Name box shows the current map loaded. Changes made on this screen will be saved
when you exit this screen.
- When you first come to this screen, the Map Image will be whatever was last showing on the
field screen. If you are creating a new map, the image will need to be changed. You will
need to load a jpg or png picture of the field or area into your Android from some source
such as Google Earth (TM), your county assessor's GIS system, a picture from a quad copter, etc.
Put the image in the right directory with Android's file app -
//storage//emulated//0//Android//data//com.outfarming.field.notes.
- Clicking the "Show" box allows you to show tracking points and lines from only the current map
or for all tracking points that are in the boundaries of your screen. If you have two areas
visible on the screen that you track separately, you can limit those shown to those that are
recorded on the current map. I have three maps that I use for our city. Each with a different scale.
If I'm tracking where I've been, I like to leave this at "All tracking points." and then switch
maps. I can see my entire trail.
- You may export the field note and waypoint information to a csv file and use in on another computer
or save it and load it again.
- The Data Stats button allows you to see how many records you have saved from tracking, field notes,
and waypoints.
- Depending on the background colors of your map image, you may change the color of the line used
for tracking you path be selecting "R" for red, etc. Yellow, green, or blue may be used.
- The GPS information in the top left corner of the field screen may be displayed in black or white
to contrast with the background image.
 |
- When you start a new map, you need to associate GPS coordinates with spots A & B on the map.
I pick a spot in the upper left hand corner area to use as the A reference point. When in a farm
field, I pick the corner of the field. When I'm mapping an area between several towns, I
pick the center of a town to be my reference point A. I create a reference spot B toward the bottom
right area of the map (image). If I can get the GPS coordinates from Google Maps (TM) or
whatever source I used to get the map, I will click on the white boxes and enter the coordinates
for A & B.
- Another way of setting the GPS coordinates is to "drive" to spot A and press the "Set A Lat/Long here"
botton. Do the same thing with spot B.
- Explanation: Telling the "map" where a couple of GPS coordinates are located allows the app to track
your position and to mark Field Notes and Waypoints.
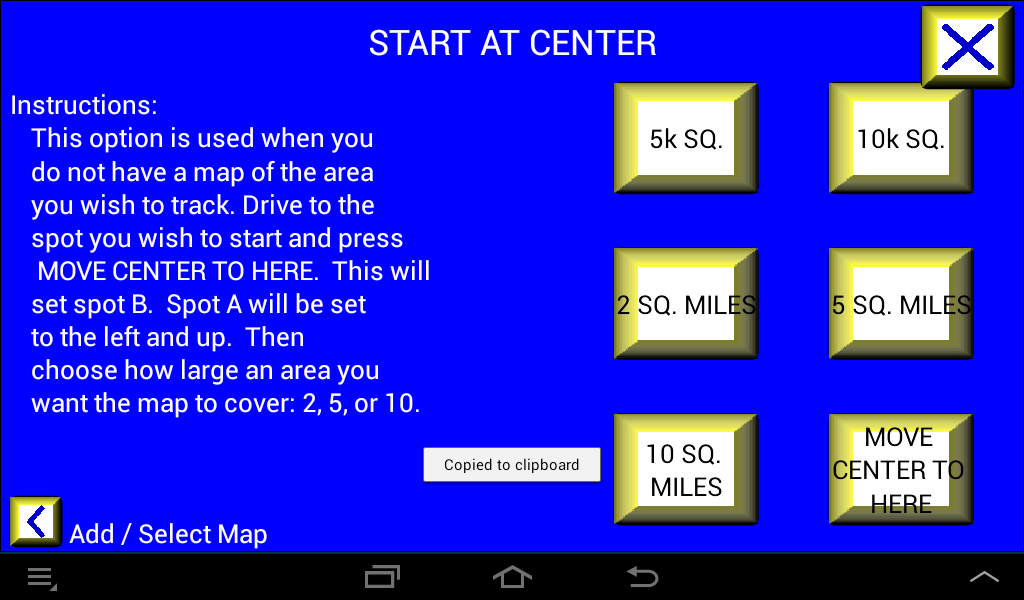 |
- If you are in an area where you do not have a map, you can use this function to accurately
capture your path and notes or waypoints. If you change the image name to "blank.jpg" the app
will use a mostly blank image (actually a light grey picture). Setting the spot B to be where
you are near the center of the map. Selecting one of the choices for the size of the area you
are in will position spot A and give it GPS coordinates. Your path will show relative
to these two locations.
- An alternate way of setting GPS coordinates is to drive to a location you can see on the map and
then use the Start At Center screen. Click the "Move Center to Here" button. Then pick one of the
buttons to select the size of area on your map. On the map screen you will need to use the Function
button to move spot B to correspond with where you are actually at on the map. Spot A will be positioned
somewhere to the left upper area depending on what size area you chose. To be able to accurately map
where things are at on the map, you will eventually need to correct spot A to correspond to
an actual point on the map and get its GPs coordinates. Your path, field notes, and waypoints
are captured with correct GPS coordinates so if you change or correct your map later, your
data stays accurate.
